
troveTariffBuilderExt
Tariff Builder Utility
Registered StackHub users may elect to receive email notifications whenever a new package version is released or a comment is posted on the forum.
There are 2 watchers.
The Tariff Builder App facilitates the process of creating, deploying, and maintaining an electric utility rate model.
Tariff Builder 1.2.0+ requires SkySpark v3.1.1+. For SkySpark v3.0.27 - 29, download Tariff Builder v1.1.0.
This app supports the following:
The following sections provide a brief description of each step in the process as you prepare to create your first tariff model with Tariff Builder.
Licensed users can also view a video training series for a more visual learning experience.
Tariff Builder integrates with the RateAcuity™ Database product to obtain detailed and up-to-date information for 12,000+ unique tariff schedules from over 1,800 different utility companies. All of these tariffs are available for selection within this Tariff Builder App. Follow these steps to easily navigate to your desired tariff.
Filter Utilities: Selecting a utility will allow you to see all the tariffs in the database for that utility. You can filter the list of utilities several ways:
geoState value for the 1st Site on your project.Select Utility: Select the row for the desired utility to populate the tariff table with all available tariffs.
Select Tariff: Carefully review all the tariff schedules presented in the table to locate the applicable tariff for your project.
WARNING: Once a specific tariff is selected in this step, 1 unit of license capacity will be tied to that tariff for a minimum of one year. The only way to select a different tariff after this step is to use additional tariff license capacity or release the tariff after the one year minimum time has elapsed.
TIP: Use the info button to the left of any table row to view more details for that row.
When a tariff is imported from the RateAcuity™ Database, it is sorted by charge type and presented on the Tariff Details View. Within this view, these charges can be customized to match the specific billing account to be modeled.
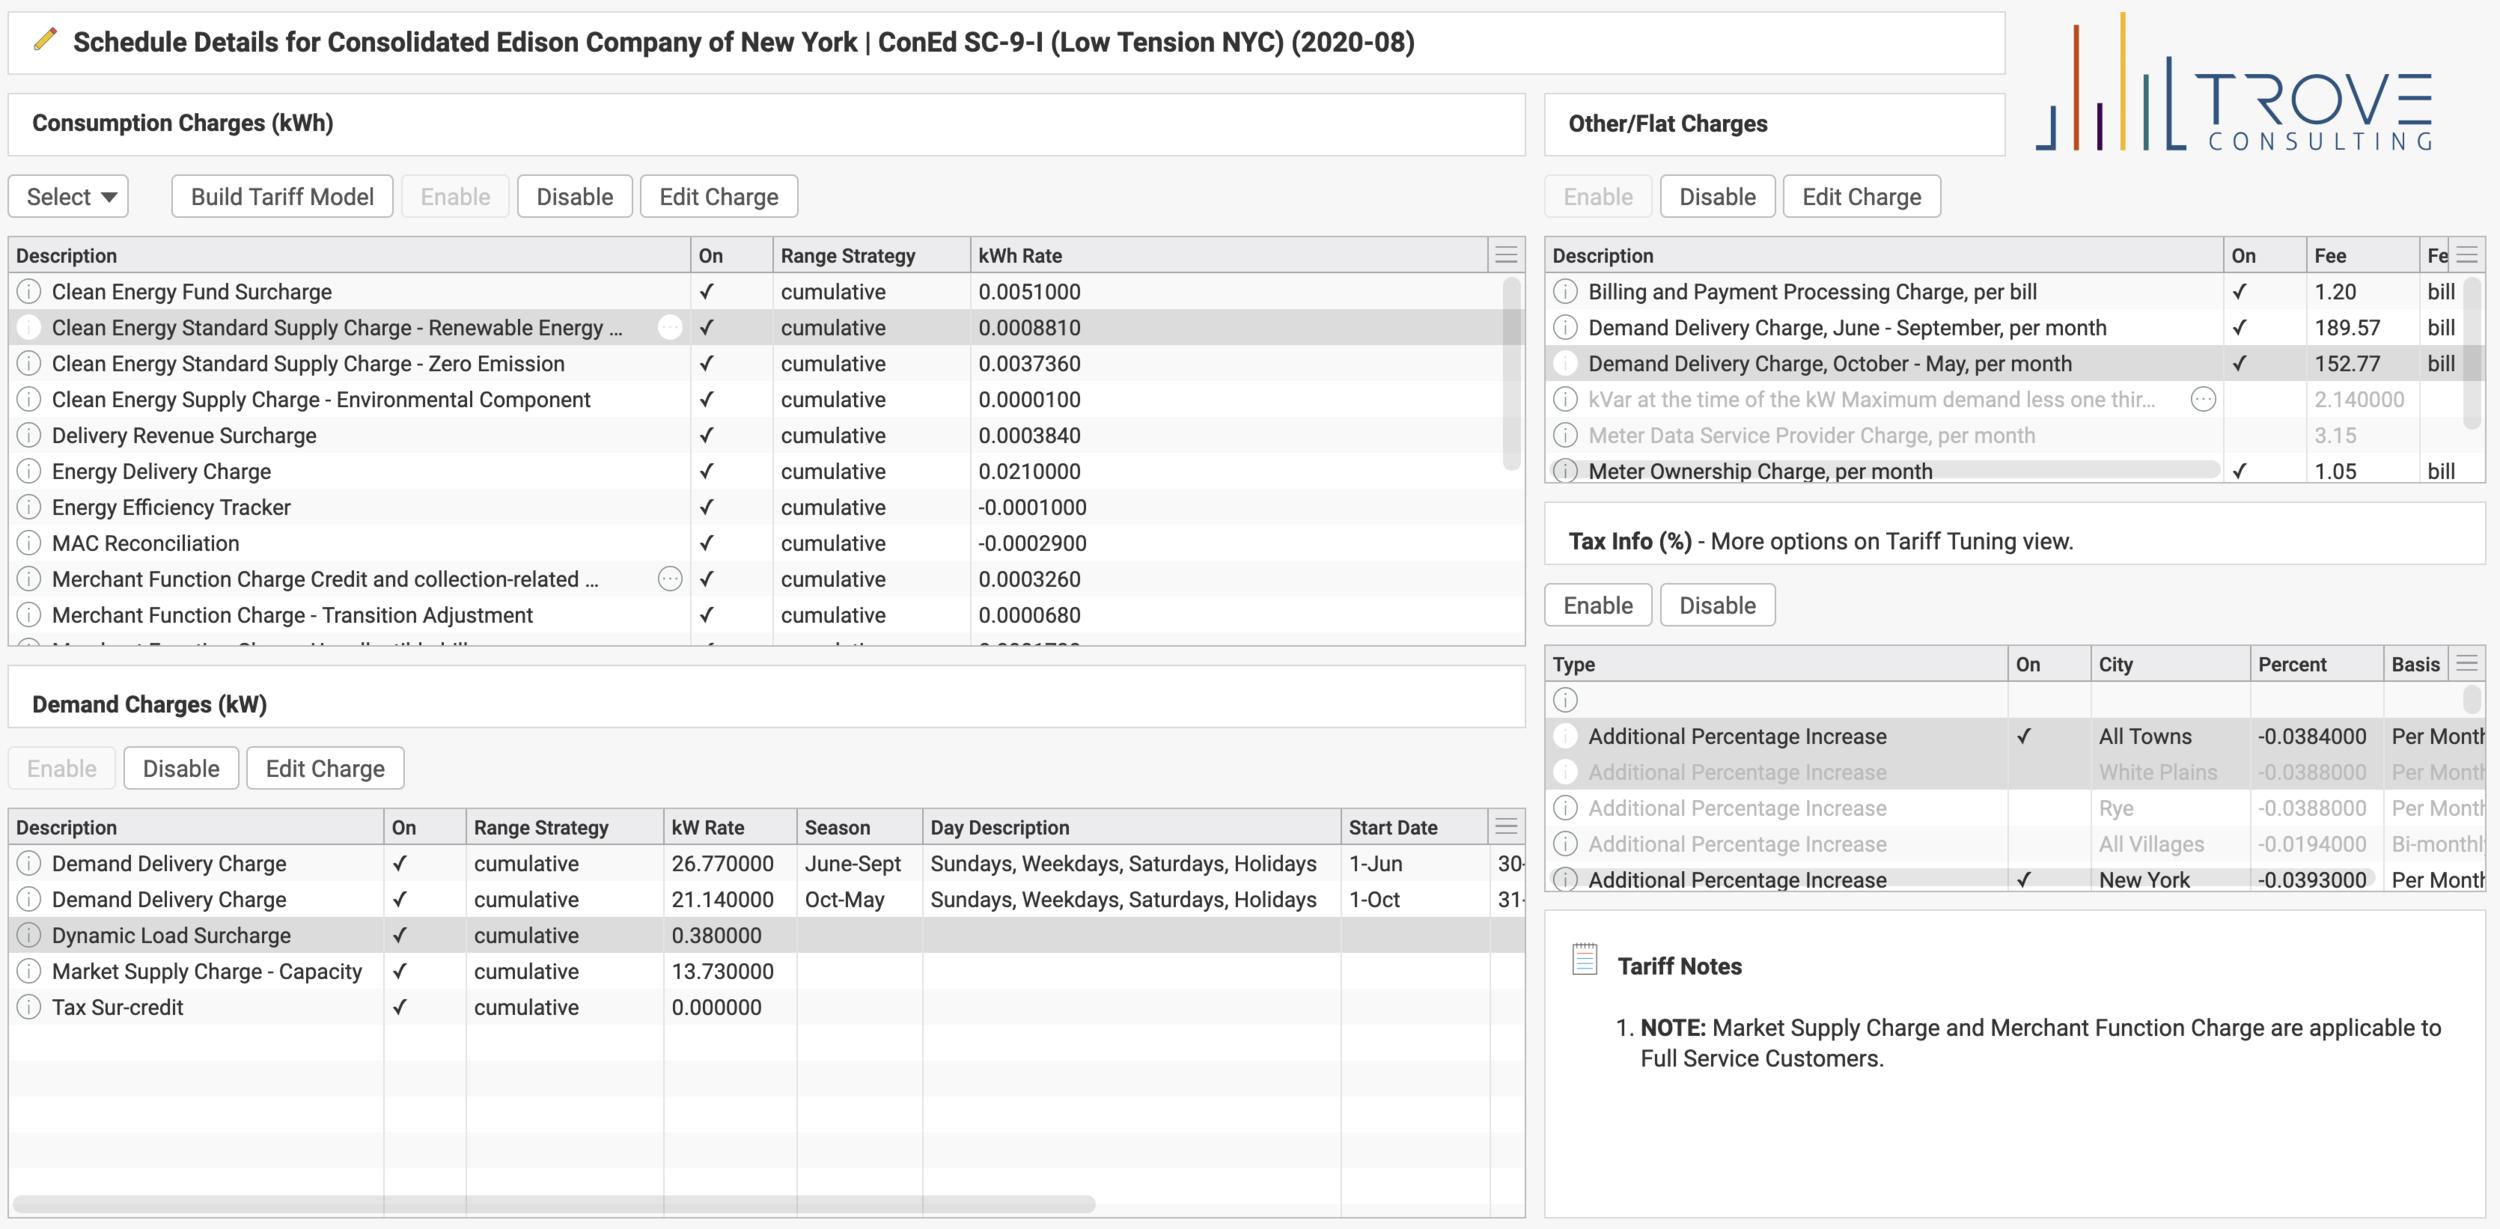
Select Source Tariff: By default, this view will populate with details for the most recently imported tariff from the Tariff Select View. You can change this selection using the Select drop-down on the Consumption Charges subview.
Customize Charges: All of the tariff details are grouped by charge type and displayed within five different subviews. Four of these subviews provide action buttons that allow the user to customize the charges contained in the table. These actions are:
TIP: In the Edit dialog window, hover over any tag name to view the help doc for that specific tag.
Review Notes: For many tariffs, important details about how to apply charges are included as simple notes. Carefully review all the notes for the tariff you are configuring to see if you need to make additional changes to the tariff charges. Information about demand ratchets or contract minimums are often contained within the notes.
Build Tariff Model: Once all charges have been updated as needed, use the Build Tariff Model action on the Consumption Charges subview to translate these charge details into a new tariff model. There will be a pop-up input dialog where you can enter a unique name for the new tariff model. If you leave this blank, the new tariff Model will be given the default tariff name.
TIP: You can build multiple tariff models with different detail configurations from a single imported tariff. This is helpful when you have multiple buildings on a site that use the same rate tariff but have different configurations.
After the configured tariff details have been built into a tariff model, additional tuning may be required. This is done on the Tariff Tuning View. Additionally, this view allows for the configuration of percentage-based charges with the proper charge references. (tariffChargeRefs)
Select Tariff Model: Use the Select drop-down to choose which tariff model to view and tune.
Edit: To make changes to the selected charge(s), use the Edit action button. This will bring up an edit dialog to modify any of the tags on this charge.
WARNING: Changes to the tags on built tariff charges can result in invalid configurations which will cause the tariff engine to error. Basic validation is built in to prevent a various invalid changes, but still use caution while making changes.
Copy: To make a copy of the selected charge, use the Copy action button. The copied charge will be a Custom Charge with the troveTbCustomCharge marker tag. Custom Charges are unique to the Model Group they are created on and do not have troveTbSourceRefs since they are not based on source details from the RateAcuity™ Database. Custom Charges are transferred forward to newer tariff versions during the Extend Models action by default. They can be edited the same as other charges.
Trash: To trash the selected charge(s), use the Trash action button.
View Percent Charges: On the right side of the view you can see all the percentage charges for the selected tariff model. By selecting any of the charges in the table, you can view any existing charge references on that charge. These references determine which other charges in the tariff model that the selected percentage charge is applied to in cost calculations.
Create Percentage Charge References: After selecting a specific percentage charge in the percentage charge table, you can select any number of charges on the left side table to assign to that charge. With the desired charges selected, use the Assign to Selected Percent Charge action to create tariffChargeRefs for those charges. If the edit mode drop-down is set to Model Group, the changes will be applied to all model versions that are in the same Model Group as the selected tariff model. If Selected Model is chosen, the changes will only be applied to the tariff model currently displayed.
Remove Percentage Charge References: If the currently selected percentage charge already has tariffChargeRefs, they will be listed along the right side of the view. Charge references can be removed by selecting them in the table and using the Remove Percent Charge Reference action. The behavior of the remove action is modified by the edit mode drop-down in the same way as the assign action.
A tariff bill history is how a specific tariff model is assigned to meter data in order to calculate costs. The bill history defines the start date of each billing period. This is also often referred to as the meter read date. New bill histories can be easily generated, edited, and assigned from the Tariff Bills View.
Generate New History: After selecting the tariff model group you would like to make a history for, you will be shown a form that allows you to adjust the details of that history. Once you enter all the desired inputs into the form, you can use the Submit action to create the new history. If you want to generate a history based on an existing his point, select the desired point from the picker in the bottom left subview and use the corresponding Submit action. You will receive a confirmation that shows the details of the history that was created.
TIP: View the help doc for any of the form inputs by hovering over the tag name.
Existing Histories: The existing tariff bill histories for the selected tariff model group are listed in the center view along with their configuration details. Selecting the row of an existing bill history will display it in the right subview. You can easily review, add, edit, and delete bills in this subview.
TIP: The Tariff Date Check column provides a helpful check/review of the effective date of a tariff.
Assign Meters a Bill History: The bottom subview lists any electric meters in the current project. The bill history that is selected in the center top table can be assigned to any meter by selecting the meter row in the bottom table and using the Change Bill History action.
It is important to be able to visualize how and when the charges in a tariff are applied. This makes it easier to identify any outliers or errors in the tariff model. It can also provide a valuable visualization for facility stakeholders to develop their operational strategies for cost savings. This visualization is provided in the Cost Graphs View.
Select Tariff Model: Simply select the tariff model you would like to visualize to populate the graphs for that tariff. By default, this will generate 24-hour unit cost graphs for every combination of season, day type (weekday or weekend), and charge type (consumption or demand).
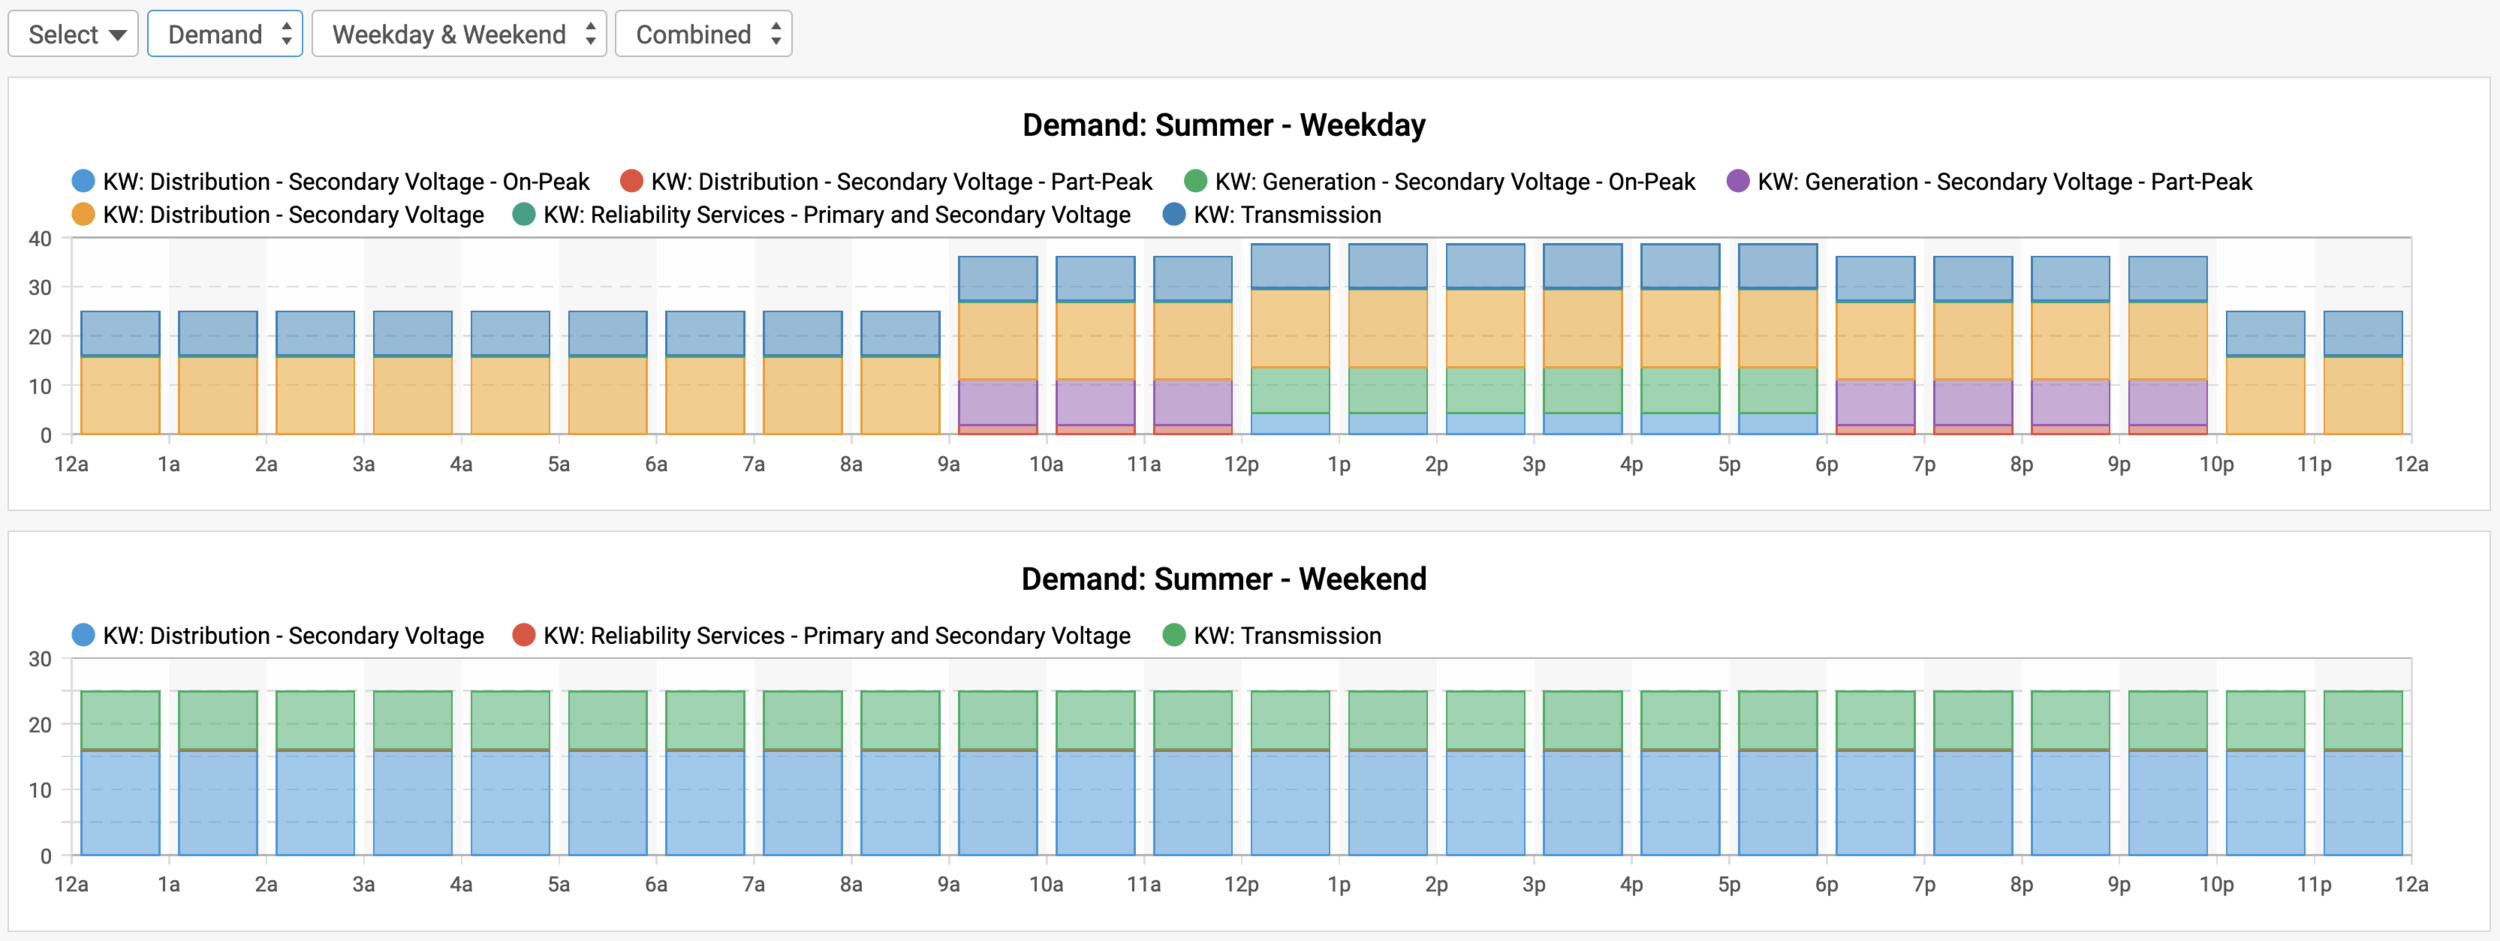
Customize Graphs: Using the drop-down options at the top of the view, you can adjust which combination of graphs are displayed. These options include:
TIP: The graphs on the Cost Graphs View are based solely on the tariff model and they do not use any meter data. They only provide unit cost information from the tariff. As a result, a tariff can be viewed in the Model Graphs View immediately after it has been created using the Build Tariff Model action on the Tariff Details View. Doing so can help inform adjustments that may need to be made during the tariff tuning process. Changes made to a tariff model will be immediately reflected in the Cost Graphs View for quick visualization. Note that flat charges and percentage-based charges are not included on the Cost Graphs View.
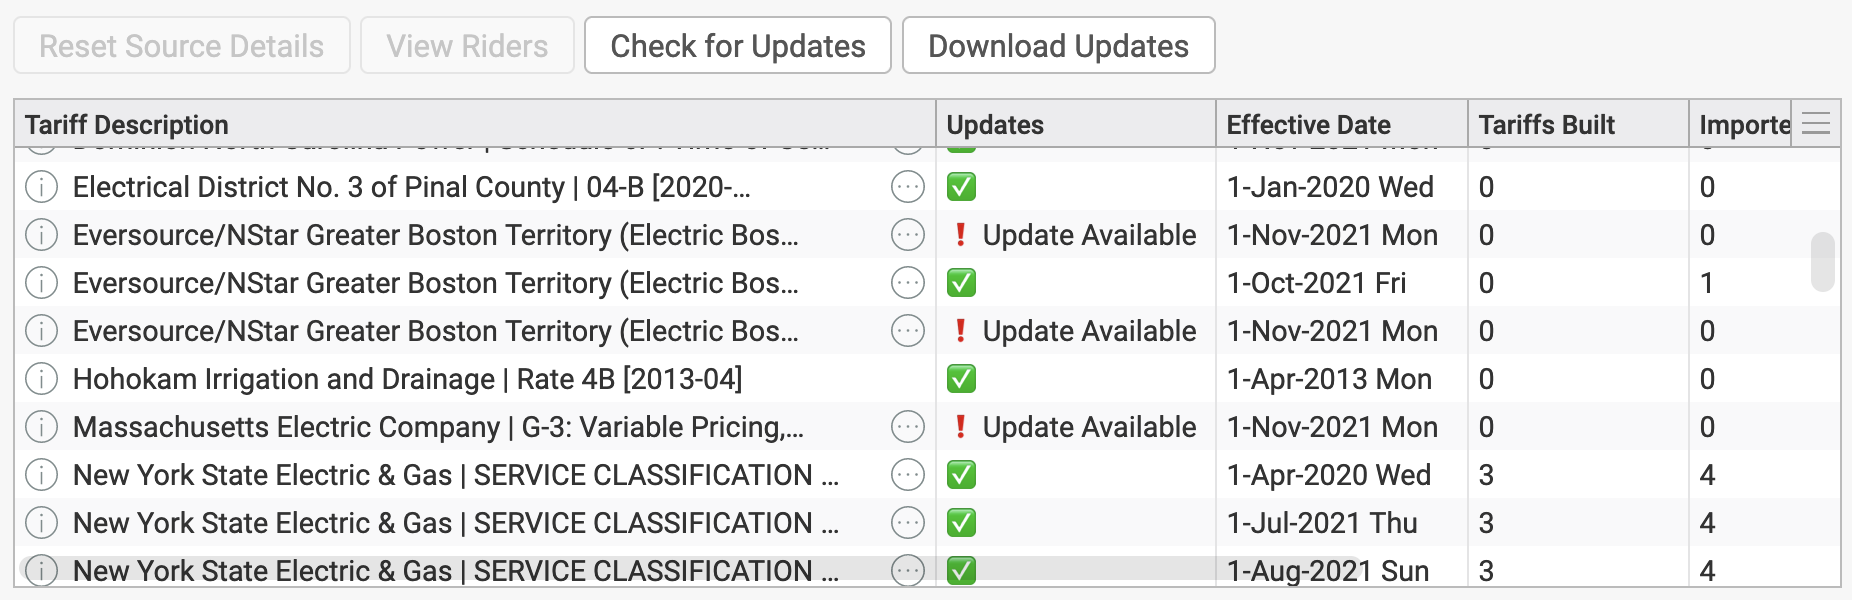
New tariff details are regularly published by various utilities. Tariff Builder allows you to perform a scheduled Task/Job to check for new versions of a tariff and download them from the RateAcuity™ Database when available. This can also be completed on demand using the Check for Updates action and Download Updates action on the Start View. When updates are available for download, ”Update Available” will be displayed next to other versions of that tariff in the Tariff Status table.
Update Task
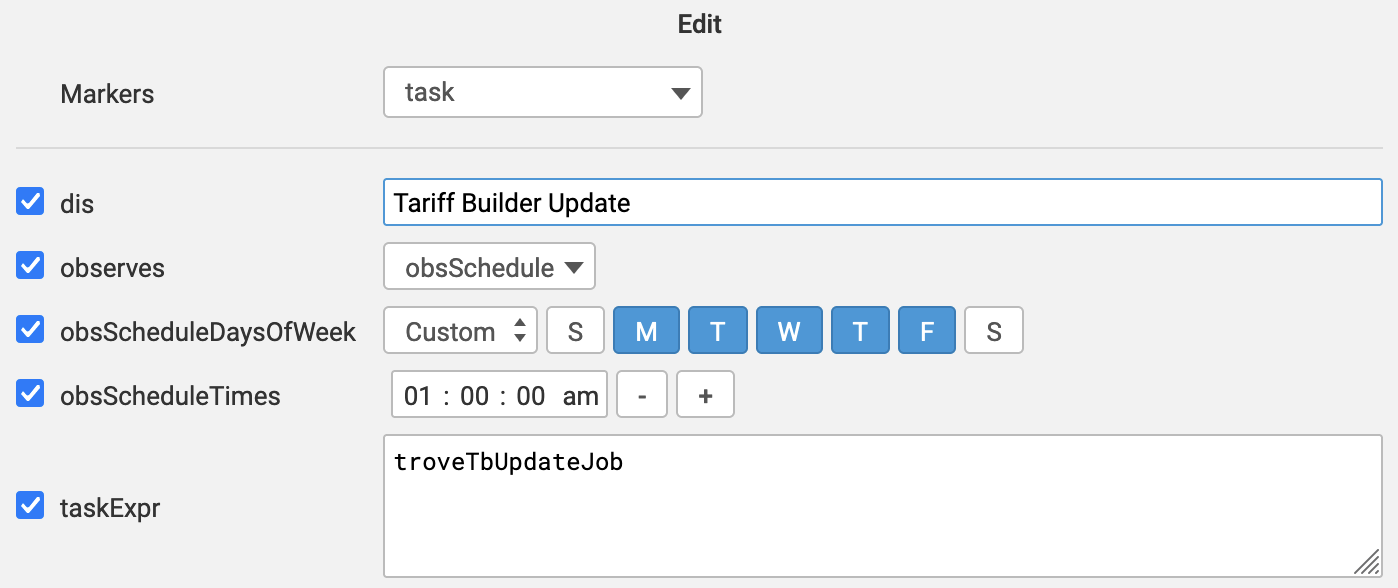
To create an update task, go to the Task App and use the New action. Configure your new task with these recommended tags:
dis: "Tariff Builder Update"
observes: obsSchedule
obsScheduleDaysOfWeek: "mon,tue,wed,thu,fri"
obsScheduleTimes: [01:00:00]
taskExpr: troveTbUpdateTask()
Update Job
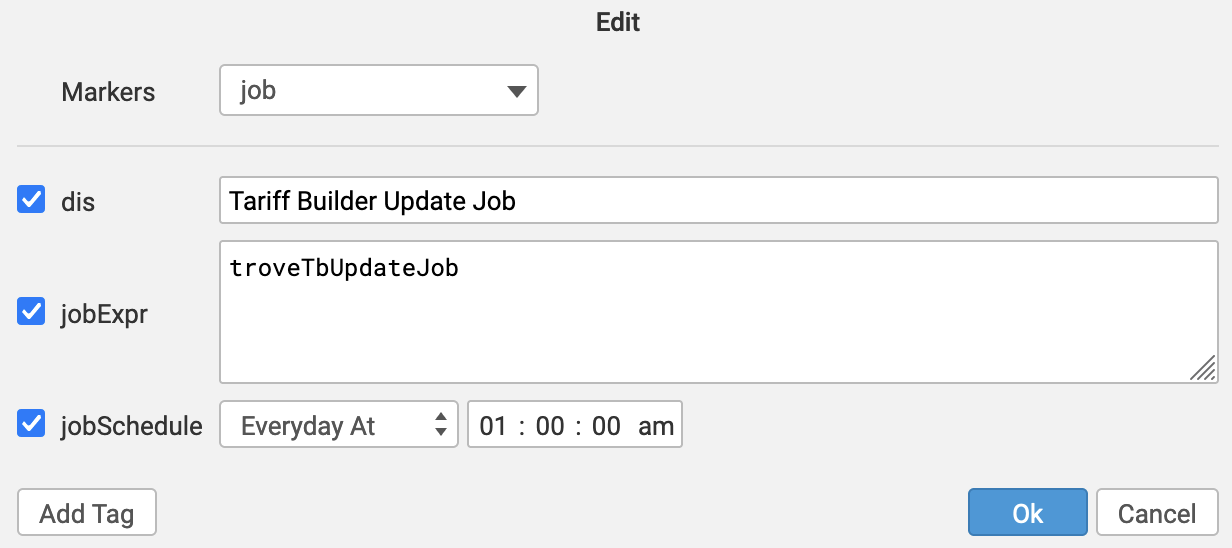
To create an update job, go to the Tools App and use the New action on the Job View. Configure your new job with these recommended tags:
dis: "Tariff Builder Update"
jobExpr: troveTbUpdateTask()
jobSchedule: everyday at 01:00:00
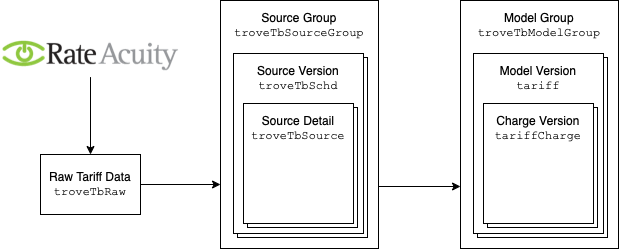
With utility companies regularly publishing updated tariff details, it is necessary to manage multiple versions of a tariff with each version having a corresponding date range that it is effective over. These versions are defined as Source details since they provide the source information which is used to create a tariff model in SkySpark. They are identified with the troveTbSource tag. A group of tariff detail versions that all belong to the same utility tariff ID are a Source Group. Source Groups are identified with the troveTbSourceGroup tag.
When new tariff details are downloaded using Tariff Builder, those details are compared against the details from the prior version of that tariff. The result of this comparison process can be viewed and modified on the Version Linking View by selecting a tariff source version. Most of the tariff details will be automatically matched between tariff versions. Other details may need to be manually linked or marked as a new charge. A linked detail includes a reference tag (troveTbSourceRef) to a corresponding detail from the source version that immediately precedes it. Tariff source details will have one of the following Link Status values:
Linked A reference tag to a previous detail instance exists.Matched A matching tariff detail was found and can be automatically linked.New The detail is new to this tariff version.No Match A matching tariff detail was not found in the previous instance details. You can match details manually or mark as new.No Previous There is no previous version of the tariff available to match to.Navigation
A tariff version can be directly selected using the Select drop-down in the view. Once a tariff has been selected, you can use the navigation arrows directly above the Select drop-down to move to the Previous or Next tariff version.
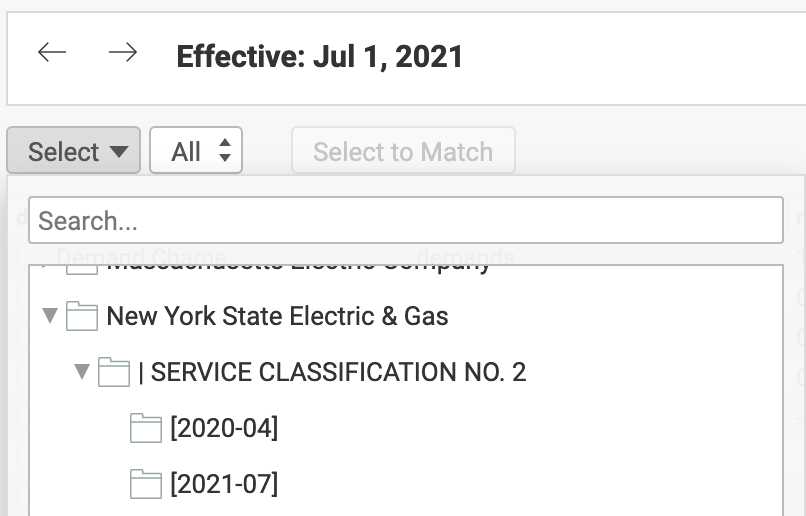
The displayed tariff details can be filtered to show only unlinked details. This filter is set to ”All” by default but it can be changed to ”Unlinked” from the drop-down. When in Unlinked mode, the behavior of the Next and Previous navigation buttons is modified to skip to tariffs that need review. This streamlines the process of reviewing new tariff details after an update has been completed.
Match Linking
Tariff details for the selected source version will be populated in the right view pane while the details for the previous source version will be population in the left view pane. Tariff details for the selected source version with a status of Matched can be automatically linked using the Link Matches action. Using the Link All Matches action will link all matched tariff details across all imported source versions. The source linking progress is visually represented by the progress bar along the right side of the view. Review of the tariff details is completed when the progress shows only Linked and New values.
Manual Linking
If the name or description of a tariff detail changes between versions, it may be necessary to manually link the tariff detail to the corresponding detail on the previous tariff version. To manually link two details:
New Detail
If a tariff detail is new for the selected source version, it must be marked as such using the Mark as New action.
TIP: Using this action with a selected row that already has a status of
newwill change the Status back tonoMatch.
Each time a new tariff model is built, a Model Group is created for that new model. A Model Group is a set of one or more tariff models that are all derived from the same Source Group, with each tariff model in the group having a different effective date range. The Model Groups View provides several powerful tools to update and edit Model Groups. This includes:
Source Group Status
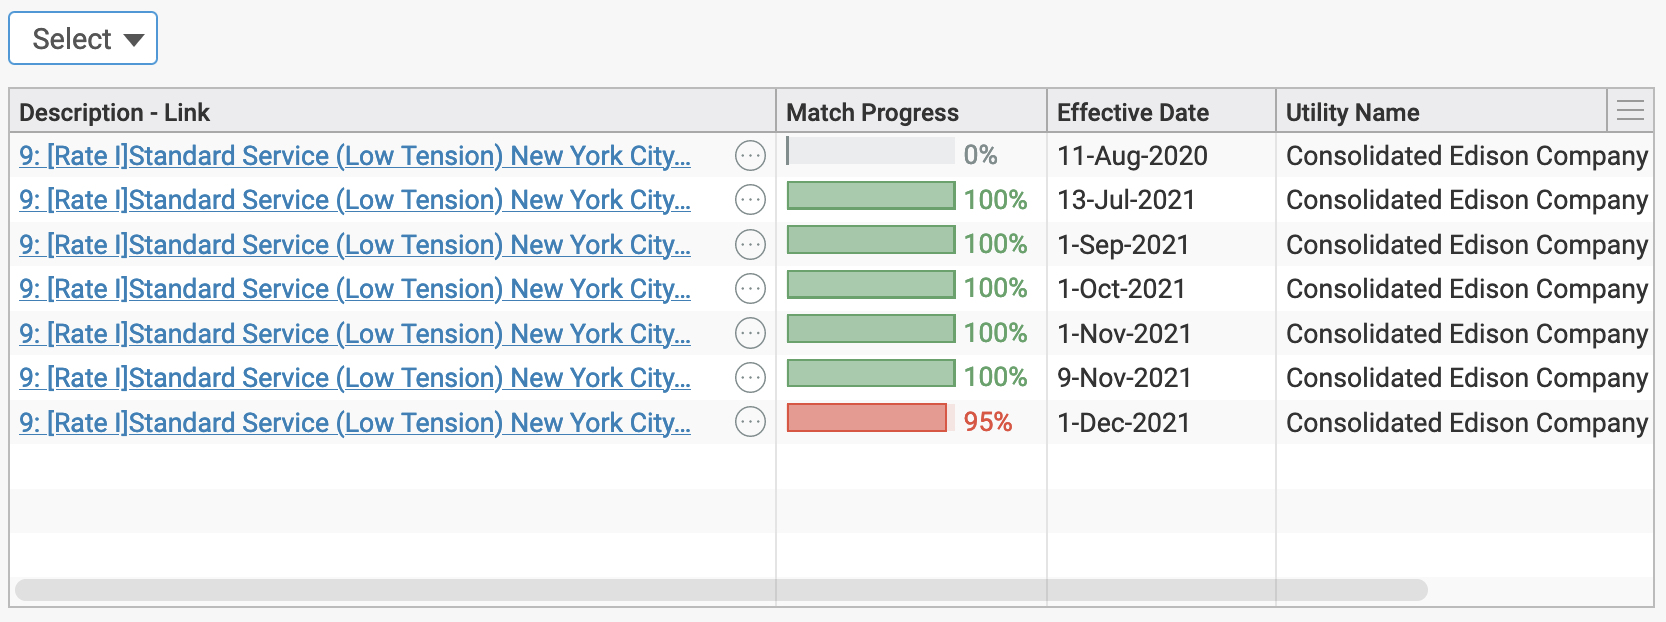
Use the selection drop-down to choose a Source Group to view. For the selected Source Group, you can see each different version of the tariff that is available and the current Linking Progress. The Linking Progress should reach 100% once all charges in a tariff version have a status of Linked or New. The first version in the table will always show 0% Progress since there are no prior versions of the tariff to link back to. For any other versions that have not reached 100%, you can click on the description to navigate to the Version Linking View for that source version to review and complete the process.
Model Group Status
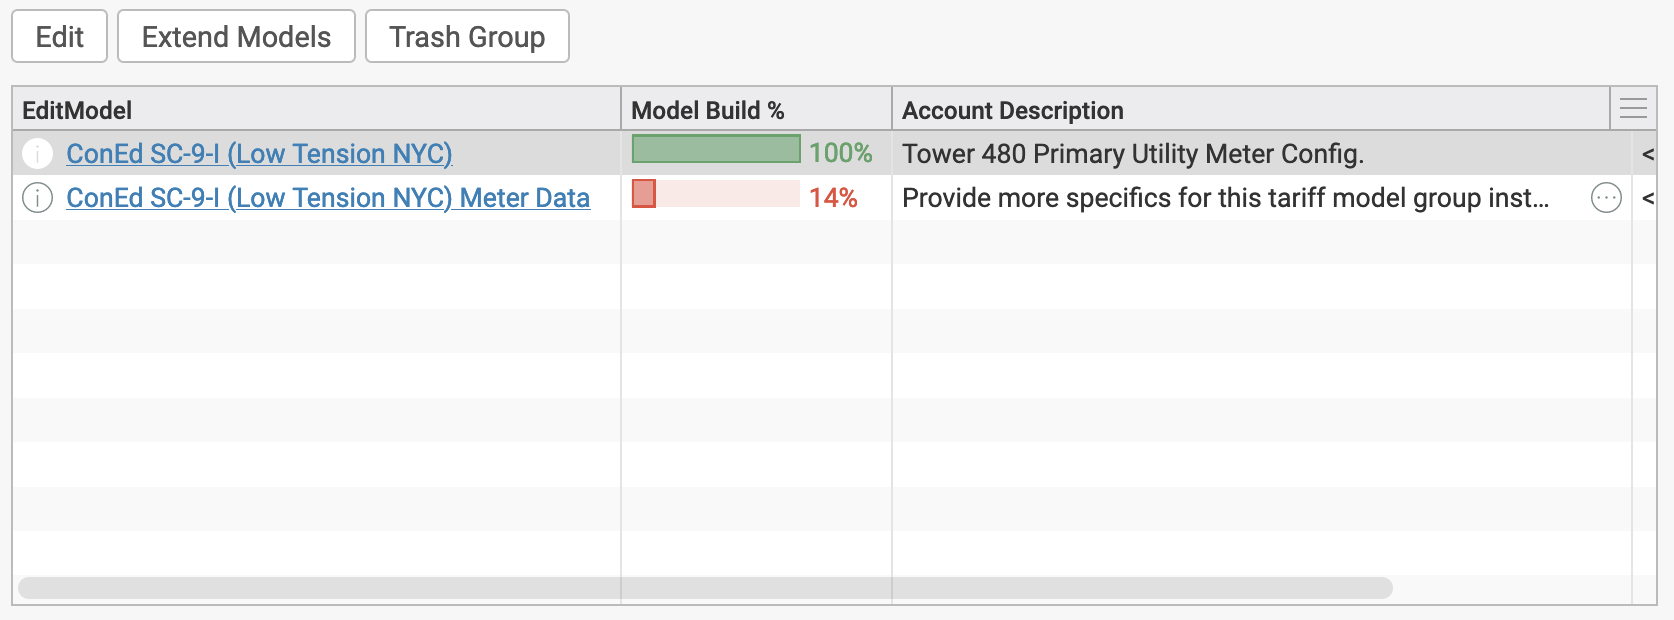
For the selected Source Group, you will also see any Model Groups that were created from versions in that Source Group. The Model Group Table displays the name, description, model build progress, and grid of the existing models in the group. Name and description can be modified using the Edit action. The Model Build % shows if there is a model version corresponding to each source version.
Extend Models: If a Model Group shows a Model Build % less than 100% and the source details are fully linked, you can select the Model Group and use the Extend Models action. This action allows you to build the missing model versions based on the configuration of the existing models. When newer Source Versions include new charge details, those details will be built into model charges automatically. Those charges can later be manually edited or trashed as needed.
Selecting any Model Group row will display unique charges from all the model versions in that group in the bottom subview.
Edit Model Group Charges
The Model Groups View allows you to make charge edits across all the model versions in a model group in one step. This is different from making detailed charge edits for a specific tariff model version that is done using the Charge Tuning View. Selecting a Model Group from the lower drop-down will populate all the unique tariff charges contained within that Model Group. When there are multiple versions of a charge throughout multiple model versions, the oldest charge version will be included in the primary group charge table. The Versions column in the table will also show how many versions of that charge exist within the Model Group. Actions include:
View Charge Versions: You can view all the versions of a charge by selecting the charge row in the primary table. The bottom right table will populate with all versions of the selected charge in that Model Group.
Edit: To make changes to the selected charge(s), use the Edit action button. This will bring up an edit dialog to modify any of the tags on the selected charge(s). After confirming the edits in the dialog, any modifications will be applied across each version of the charge(s).
WARNING: Use care when making group charge edits since it is possible to overwrite important unique details between charges. Only use this edit feature to make changes that are common to all charge versions in a Model Group. To make changes to only a single charge version, use the Edit action from the Charge Tuning View. Use the View Charge Versions action to inspect all the versions of a tariff charge prior to making a group charge edit..
Copy: To make a copy of the selected charge for each model in the current Model Group, use the Copy action button. The copied charge will be a Custom Charge with the troveTbCustomCharge marker tag. A copy of the selected charge will be made for each model in the Model Group and the group of new copied charges can be edited jointly using the Edit action.
Trash: To trash the selected group charge(s), use the Trash action button. All versions of the selected charge throughout the Model Group will be trashed.
When a tariff is selected and pulled from the RateAcuity™ Database, any historical versions of tariff details are also downloaded to view and configure with Tariff Builder. These historical tariff details are accessible from the Version History View.
Historical Tariff Versions
Use the selection drop-down to choose a specific Tariff Source Group to view. For the selected Source Group, you can see each historical version of the tariff that is available. Versions that are already imported into the local database are highlighted in green. Selecting the row of any version will display the details of the table on the right side of the view.
Add Version: Import selected version(s) into the local database.\n\n
Remove Version: Remove selected version(s) from the local database.
TIP: When using historical tariff details, be sure to import the earliest desired version, up to the current version, before continuing with any other tariff creation steps. The processes for linking and extending tariff details are designed to progress linearly from the oldest tariff version to the most recent.
Tariff Details
For the selected version, you will see its associated charge details. You can filter the table data to only show details modified as of the effective date of the selected version. You can also filter based on whether the details have an effective date or not.
Retiring Details
When working with historical tariff details, it may be necessary to manually retire a specific detail so that it is not included in versions beyond a certain point. When tariff details are retired, they can either be filtered out of the view or displayed as needed.
Retire Charge: Set the selected charge to be excluded from the currently selected tariff version and all future tariff versions. Retired charges will be highlighted in orange.
Restore Charge: If the currently selected charge was retired, restore it using this action.
Beyond the licensing detail provided on the Start View, a list of the tariffs that are currently committed to licensing capacity across all projects can be viewed on the TB Licensing View within the Host App. The default view state lists the tariff ID number, project the tariff is configured within, and the release status of the tariff. Selecting Detailed from the first selection drop-down will provide additional details from the RateAcuity™ Database for each table item. When the minimum one year duration has elapsed since licensing capacity was committed to a tariff, that licensing capacity can be released to be applied toward a different tariff. Tariffs that are eligible to be released are indicated by a green check mark. Ineligible tariffs will display the number of days remaining in the minimum year duration until the tariff can be released.
Release Tariff: When the Active drop-down is set to false, this action will provide a summary report of all the records that would be removed from the database in the process of releasing the selected tariff, but the records will not be removed. When the Active selection is set to true, all records associated with the selected tariff will be removed from the local database, one unit of license capacity will be released, and a summary of the removed records will be provided.
WARNING: Releasing licensing capacity for a tariff involves removing all associated records including but not limited to: source, tariff, charge, schedule, tariffHis, and group records. This cannot be undone.
Special thanks to Steve Eynon of Fantom Factory for his assistance in the development of this extension and for providing the initial suggestion for the project at SkyPosium 2018.
Special thanks also to Stephanie Fetchen of KFR Services for working to bring the RateAcuity™ tariff database to the SkySpark community and for supporting its integration into Tariff Builder.
Last but not least, thanks to the SkyFoundry team for their development of the Tariff Engine within SkySpark to make modeling of complex tariff structures possible in the first place.
| Version | 1.3.4 |
|---|---|
| License | Commercial |
| Build date | 1 year ago on 20th May 2025 |
| Requirements | SkySpark v3.1.1 |
| Depends on | |
| File name | troveTariffBuilderExt.pod |
| File size | 400.95 kB |
| MD5 | c01df8396c1a9ef259258910f506b353 |
| SHA1 | a9774c18cf91d5bc24e0a7faceb483052477249f |
Published by TroveDownload nowAlso available via SkyArc Install Manager | |